windows
-
install Bazel for windows:reference
(1)Install the prerequisites (If it prompts that other versions have been installed during the installation process, there is no need to repeat the installation)
(2) You need to add environment variables for bazel to compile c++
a.Go to Start Menu > Settings.
b.Find the setting “Edit environment variables for your account”
c.Look at the list on the top (“User variables for ”), and click the “New…” button below it.
d.For “Variable name”, enter BAZEL_VC
e.Click “Browse Directory…”
f.Navigate to the VC directory of Visual Studio.
For example, this might be C:\Program Files (x86)\Microsoft Visual Studio\2019\Community\VC on your system. Select the VC folder and click OK(2)download the Bazel binary: releases you can download 3.2.0
(3) Installing compilers: download: MSYS2 x86_64
MSYS2 is a software distro and building platform for Windows. It contains Bash and common Unix tools (like grep, tar, git).(In fact, it is to create a linux-like environment for bazel under windows.) why MSYS2You will likely need these to build and run targets that depend on Bash. MSYS2 does not install these tools by default, so you need to install them manually. Projects that depend on Bash tools in PATH need this step (for example TensorFlow). Open the MSYS2 terminal and run this command:
pacman -S zip unzip patch diffutils gitOptional: If you want to use Bazel from CMD or Powershell and still be able to use Bash tools, make sure to add <MSYS2_INSTALL_PATH>/usr/bin to your PATH environment variable.
(4) add environment variable:
BAZEL_SH =C:\msys64\usr\bin\bash.exe
Rename the previously downloaded bazel-x.x.x-windows-x86_64.exe to bazel.exe and put it in C:\msys64
Administrator runs cmd to verify
> bazel version> cd tensorboard\tensorboard\plugins\projector
> bazel build:allyou will see build successfully
After that you will see that a vz-projector folder has been generated under the folder:\Users\yourpath_bazel_sxzdh\5lbeutqe\execroot\org_tensorflow_tensorboard\bazel-out\darwin-fastbuild\bin\tensorboard\plugins\projector
Then use the IIs that comes with windows to deploy static web pages
1.After selecting the folder, right-click and select "Properties"--> Select the "Security" tab--> Click "Edit" to set user permissions--> Click "Add" user--> Input in the new dialog box that pops up everyone" and then click "Check Name"--> If there is no error, click "Confirm"--> Then click "OK" to complete the modification of user permissions;
2.Copy the standalone_projector_config.json(training-visualization-frontend/tensorboard/tensorboard/plugins/projector/vz_projector/standalone_projector_config.json) file to the \Users\yourpath_bazel_sxzdh\5lbeutqe\execroot\org_tensorflow_tensorboard\tensorboard\plugins\projector\vz-projector folder
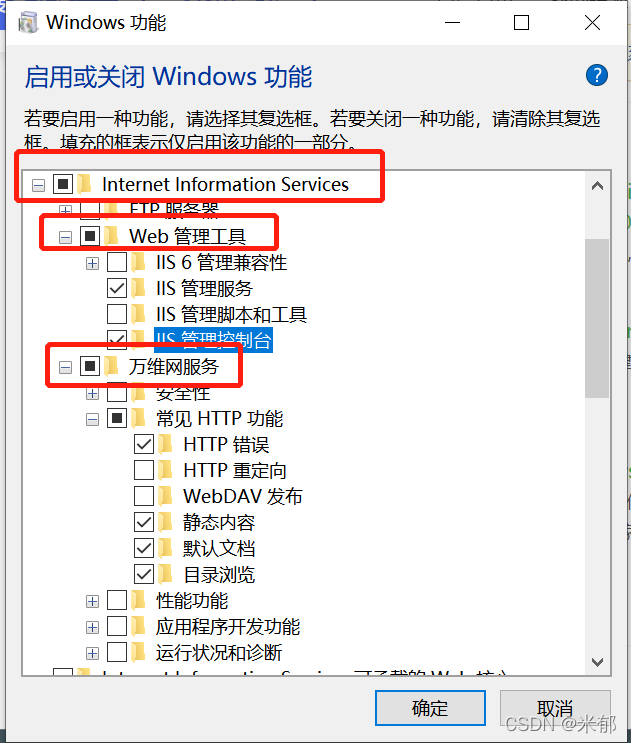
2.打开控制面板(open Contral Panel)-->选择"程序"-->选择"程序和功能"-->打开”启用或关闭Windows功能“
Select the function of Windows to open, as shown in the figure below (the most basic function of static page)
3、Right-click on the computer's Start menu, select "Computer Management", select "Services and Applications", open the IIS Management Console, right-click on "Websites", and select "Add Website";
 Set the information of the website, select the physical path to select the website folder website set in the first step, If you have to use port 80, please stop the original default website service.
After completing the setup, open localhost:port you will see a list of resources,Then select standalone.html, you can see the login interface of the project.
tips:
-
If you encounter some problems during access, such as 403 and other error codes, you can operate according to the interface
-
instructions. If it is still unsuccessful, it is recommended to directly point the physical path of default website service(port 80) to vz_projector.
-
use the branch "withoutBackend"
We need to release timevis and active learning backend as python lib in the future. After that only download and import those lib would be enough.
3.1 modify BackendAdapter.py line 17 and line 31, put your local path of DLVisDebugger and Activelearning there
$ vim git_space/training-visualization-frontend/server/timevis_backend/backend_adapter.pyconda downloading instruction from here. One simple instruction here:
$ wget https://repo.anaconda.com/miniconda/Miniconda3-py39_4.12.0-Linux-x86_64.sh
$ bash Miniconda3-py39_4.12.0-Linux-x86_64.sh
$ conda create -n timevis python=3.7
$ conda activate timevis
$ cd path/to/DLVisDebugger
$ pip install -r requirements.txtUser should customize the version of pytorch according to their machine. The default version of pytorch is 1.10.0+cu113.
$ conda install pytorch torchvision torchaudio cudatoolkit=11.3 -c pytorchCheck which pytorch version to select from here
$ pip install gdown # for downloading large file from google drive
$ cd path/to/data_folder
$ gdown https://drive.google.com/u/1/uc?id=1vpavoxajCMr5bLNs5SmXV__pL4i37b6d
$ unzip toy_model.zip
$ rm toy_model.zip # (optional)in case low drive storage
$ cd resnet18_cifar10
$ sh run.sh
You can specify which gpu to use in config.py. If none, set "GPU"=None. The default is "GPU"="0"
$(base) conda activate timevis
$(timevis) cd training-visualization-frontend/server
$(timevis) python server.py